
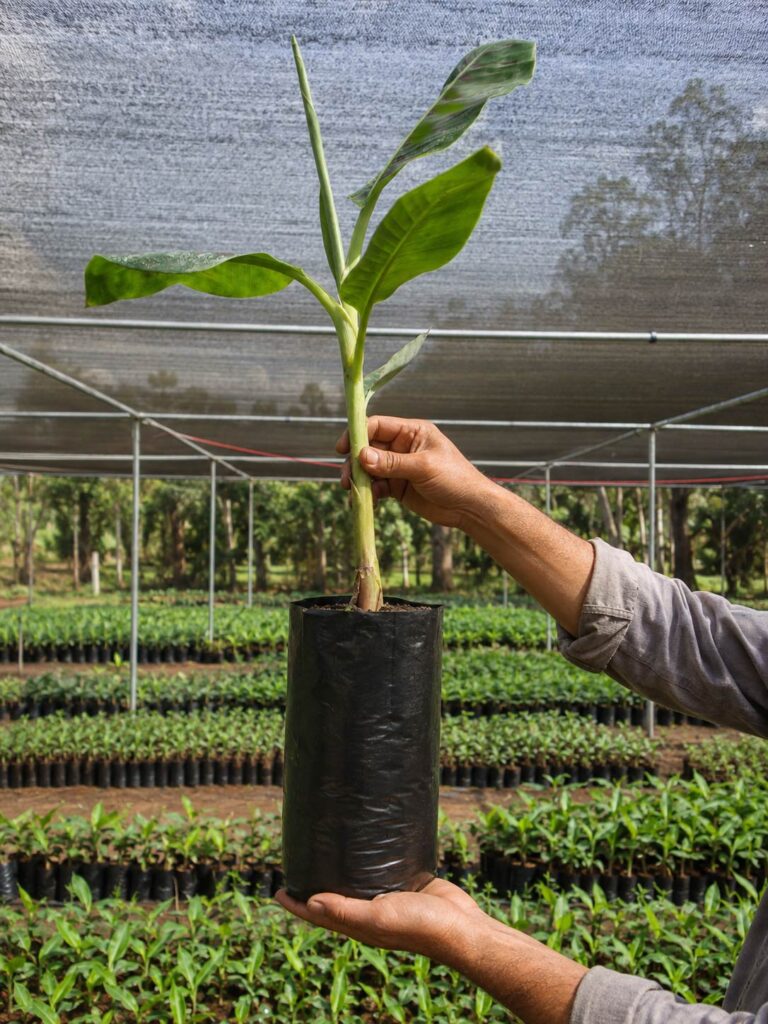
From little sucker to backyard banana plant
There’s something particularly satisfying about growing a banana plant from a sucker. One day it’s a small shoot hanging off the side of an established plant; before too long, it can be taller than you are and heading towards producing a bunch of its own.
Bananas are also remarkably willing plants. Give a healthy sucker warmth, moisture and a decent growing medium and it generally wants to grow. But there are a few tricks that can make the difference between a sucker that takes off quickly and one that turns into a rather disappointing lump of mush.
For Australian gardeners, here’s how to give your banana sucker the best possible start.
First things first: choose a good sucker
Not all banana suckers are created equal.
If you have a choice, look for what is commonly called a sword sucker. These tend to have a relatively substantial base with narrower, sword-shaped leaves rather than lots of broad leaves.
Sword suckers generally have better growth potential than the broad-leaved “water suckers” and are the preferred conventional planting material.
Think strong base rather than impressive foliage. The slightly less glamorous-looking sucker can actually be the better starting plant.
Dig it out without attacking it!
A sharp spade is your friend here.
Carefully dig around the sucker and separate it from the parent plant while retaining a good piece of the underground corm. The corm is the chunky base from which your new roots and shoots develop, so try not to hack it to pieces.
Some root loss isn’t the end of the world. Banana suckers carry stored reserves in their corm that help them re-establish after separation.
Avoid badly bruising or damaging the corm, however, as damaged tissue is more susceptible to rot.
Don’t be in too much of a hurry
Here’s a useful trick that sounds slightly strange the first time you hear it:
Don’t necessarily plant your freshly cut sucker immediately.
After preparing it, leave the sucker somewhere dry and shady for a day or two. This allows the freshly cut surfaces to dry and seal, reducing the opportunity for rot organisms to enter.
Don’t leave it baking in the Australian sun, though. We’re trying to dry the wound, not make banana jerky. Queensland DPI guidance recommends allowing prepared suckers to air-dry in the shade for one to two days.
Start it in a planter bag
You can put a sucker straight into its permanent position, but there are some real advantages to establishing a smaller sucker in a planter bag first.
And this is where a 5 litre tall poly planter bag is particularly handy.
The tall shape gives the developing roots good depth without requiring a huge amount of potting mix. It’s also easy to move the plant around while it establishes, protect it from extreme weather, and keep a closer eye on moisture than if you’ve planted your little sucker somewhere down the back garden.
Queensland advice has specifically recommended establishing small banana suckers or bits in pots or bags before planting them out. Once established, these plants can be stronger and get away more quickly after transplanting.
For a home gardener, that’s a pretty compelling reason not to rush things.
Our choice: start your young sucker in a 5 litre Tall Black Poly Planter Bag, let it develop a healthy new root system, then transplant it into a larger container or its permanent position in the garden.
The 5 litre bag isn’t intended to grow your banana all the way to fruiting — it’s its starter home.
Use a good, free-draining growing mix
Bananas enjoy moisture, but there’s an important difference between moist and waterlogged.
A quality potting mix with good drainage is ideal. You want enough moisture retention to stop the young plant drying out quickly while still allowing excess water to escape.
This is another reason a proper nursery planter bag works well: drainage holes allow excess water out rather than leaving the corm sitting in stagnant mix.
Fill your 5 litre bag with mix, make a hole large enough for the sucker and position it upright. Firm the mix around the corm so there aren’t large air pockets.
Don’t bury the entire pseudostem. The important part is having the corm securely surrounded by growing media with the plant sitting firmly upright.
And resist the temptation to dump a handful of strong fertiliser against the corm. Queensland banana-growing guidance warns against putting nitrogen- or potassium-containing fertiliser directly into the planting hole because emerging roots can be damaged, particularly under dry conditions.
There’ll be plenty of time to feed your hungry banana once it’s growing.
Water it — but don’t love it to death
This is probably where enthusiastic gardeners get themselves into trouble.
Your newly planted sucker doesn’t yet have a large functioning root system. Keeping the mix evenly moist is the aim; keeping it permanently saturated isn’t.
Give the bag a thorough watering after planting and then monitor it rather than automatically reaching for the hose every morning.
How often you water will depend enormously on where you live. A banana sucker sitting outside in Cairns in January is living a very different life from one in Melbourne in September.
Warm weather, wind, potting mix and the size of the sucker all affect how quickly the bag dries.
So use the world’s cheapest moisture meter: your finger.
Give it warmth and light
Bananas are tropical and subtropical plants, so warmth gets them moving.
Position your newly planted sucker somewhere warm, bright and protected, particularly while it is establishing. Avoid suddenly putting a stressed, freshly separated sucker into an exposed position where it’s going to be hammered by hot afternoon sun and wind.
Once you see fresh leaf growth appearing, you’ve received the message you’ve been waiting for:
Your sucker has struck! 🌱
That’s when the fun really starts.
When should you plant banana suckers in Australia?
This depends greatly on where you live.
In South East Queensland, early spring is an excellent time for establishing conventional banana planting material because conditions are warming without the combination of extreme heat and excessive moisture that can encourage rotting. September–October has traditionally been recommended for striking suckers in SE Queensland.
In tropical northern Australia the growing calendar is obviously different, while gardeners in cooler southern areas should generally wait for reliably warmer conditions.
One advantage of starting your sucker in a 5 litre planter bag is that you have much more control. If conditions suddenly turn cold, excessively wet or scorching hot, you can simply move it.
Try doing that after you’ve planted it in the back corner of the garden!
When is it ready to leave the 5 litre bag?
Don’t judge this purely by height.
You’re looking for active new growth and a developing root system. Once the plant is growing strongly and the roots are beginning to occupy the planter bag, it’s time for the next stage.
You can then transplant it into the ground or step it up into a substantially larger planter bag if you’re going to continue container growing.
The 5 litre tall bag has done its job: turning a freshly separated sucker into an established young banana plant.
One very important Australian banana warning
Before you knock on your neighbour’s door and ask for one of their banana suckers, there’s something Australian gardeners really need to know.
Banana planting material can spread serious pests and diseases, including Panama disease, banana bunchy top virus, banana weevil borer and nematodes. Queensland authorities recommend Quality Banana Approved Nursery (QBAN) plants as a safe source of planting material.
There are also legal restrictions on moving banana plants, suckers and other planting material between Australian states and between some banana biosecurity zones. For example, the Australian Banana Growers’ Council notes restrictions applying to movement into Queensland and NSW from other states, as well as movements involving Queensland banana biosecurity zones.
So before buying, sharing or transporting a sucker, check the current biosecurity requirements for your state and area.
It’s considerably less exciting than growing bananas, but considerably more exciting than accidentally introducing Panama disease to your neighbourhood.
And then… bananas!
Once established, your little plant is going to want sunshine, water, food and room — lots more room!
A 5 litre planter bag is the nursery, not the forever home.
As the banana grows, move it into its permanent garden position or progressively larger growing container. Bananas are vigorous plants with big appetites, and ultimately they’ll need substantially more soil volume than their little starter bag provides.
Then comes the part you’ve been waiting for: the flower appears, the hands of bananas develop and those tiny fingers begin pointing upwards.
And that’s the perfect time to start thinking about protecting your future crop with a banana fruit bunch cover.
Because after spending all that time growing your banana plant, you don’t really want the birds and flying foxes enjoying the harvest before you do! 🍌
Ready to start your own banana plant?
Our 5 Litre Tall Black Poly Planter Bags are a great size for establishing banana suckers before they’re transplanted into their permanent growing position.
Strong, economical and reusable, they’re the same style of planter bag widely used for growing young plants in nurseries — and their tall profile makes them particularly well suited to getting a young banana off to a great start.
One sucker. One planter bag. And, with a little patience, hopefully a whole lot of bananas. 🍌🌱